I entertained the thought of selling these snowflakes, but somehow I have ended up in the tangled web of computer games and abandoned my shop a little. But since it is December, finally, and Christmassy things are justified, I am going to show you how to make them. It's the way I was taught from pvery early age and I have used snowflakes as Christmas decorations ever since, one way or the other.
You will need:
Scissors - best are the longer and sharper kind, and remember to be very careful, and not to use the tips. If you have your kids making snowflakes, choose ones that are medium sized with round tips that open and close easily. It will make a difference. There won't be as many snowflakes cut in half. :D I use big Fiskars ones.
Paper - Now here's the good time to go through your paper recycling bag and find the white printer paper that is only a bit used, like printer calibrations etc. I have used old bank statements, junk mail that has printing only on one side, receipts from internet shops. (Also, I used blue tones from regular magazines etc to make Xmas cards last year.) The best kind of paper is still white printer paper, it is stiff and hard enough and relatively cheap.
The size you need your paper to be is quarter of A4. It will leave your snowflakes about 10cm in diameter. If your snowflake makers are kids, especially not very experienced ones, I would use half an A4 for practice. These bigger snowflakes can go on windows later and they will look very nice. :)
Now to make the template (and be prepared to make about hundred of them for yourself and your children, because the folding can be tricky for little hands, but cutting is sooo much fun! I used to pester my mother to fold more and more and more snowflake bases for me). :)

Take your pre-cut paper and lay it on the table. (I usually do everything up in the air, but table may be easier to start with).

Fold it in half (shorter sides together) and turn 180 degrees so that open ends are at the bottom.

Fold the left top corner over to the right corner and press down make a little fold for the middle. NB! Do not fold the entire length.

Now for the tricky bit: Judging by eye, fold the right corner down by a third. It helps a bit if you place your left thumb on the little fold you just made. (In your mind, note down a point about 5mm to the right of the bottom left corner and line the top right corner up with that point, it should be about accurate.) Don't worry if you don't get it immediately. Practice makes perfect! :) Turn over.

Now fold down the other corner (right one again), lining the corner up with the fold you just made.

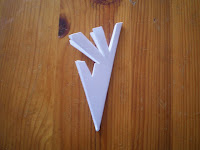
Fold the whole thing in half and turn 180 degrees. That is what your snowflake template should look like. Can you see the the lines in the middle? This is where you have to cut off the top, and your snowflake template is ready!

Your snowflake should look like this. Discard the top and you are ready for the fun bit!
You can cut any design you like into your snowflake, but over the years I have found that triangles work the best - they are easy to cut, just straight lines crossing, and the result looks realistic. Edit: I also don't draw anything onto my snowflakes, I just "go with the flow", but you might want to try and draw something on for guidelines: see the photo with all my designs this year below.

I normally start with the top to give my snowflake nice pointy ends. Of course, you can cut just little lines to give it a fringe-y edge or not cut the edge at all.

The very clever bit which results sometimes in spectacular snowflakes is here: after you have cut out a triange, you can cut another triangle into the side of the one you just made!

You can also cut off the bottom tip, to make a cute little star in the middle of your snowflake.

Another double triangle...

And if we open it up... it will look like this. Maybe not the best I have made, but definitely allright.

If you wish, you can use these designs. They will end up looking like this:

Though they aren't in the right order or anything. The best bit of making a snowflake is the opening up bit! You'll never know what they're going to be like, and sometimes relatively simple-looking design can make a surprising result! :)
Happy snowfall!
Kerli,
sincerely
P.S. I tie some thread onto my snowflakes and stick them in the ceiling with some masking tape. ;) Looks great!


