Showing posts with label upcycle. Show all posts

Friday, 15 January 2010

Tutorial: Make an upcycled memory game

Have you ever thought what to do woth used wrapping paper? I feel terribly guilty when I throw them away, especially when some of them have great pictures on and sometimes the paper is thick and of good quality. Now I have found one use for them: Make a memory game for your kids. If they are babies, then this is a great way of teaching them some words, and they can help, if they are old enough (at least 4, I would think), and get more fun out of it! :)

You will need:
*Used piece of wrapping paper that has pattern with little recurring motives on it. It can be christmas one, or birthday one. You can even use several different ones to get more pairs. Try to choose bits that doesn't have many creases on them, but I don't think most kids care. (If you are planning covering the back as well, get another - different - wrapping paper)
*Scissors
*Some glue, PVA is the best, but some glue sticks work quite well too.
* Bits of light cardboard. I usually keep some empty cereal boxes etc in my kitchen in case I need some.

Let's make it!
*Cut out your motives. You can make as many pairs as you like (or as you can). I made 8 pairs - 16 pieces.


*Take your cardboard and put one of your motives on it, if the motives are of different sizes, then the biggest one. Draw a square round it, cut it out and use it as a template for other ones. My squares came from lasagne pasta and fish cake box.


* Glue your motives on your squares and let them dry. If you want to cover the backs to make a "proper" memory game, then this is the time to do it. Glue your squares loosely on a bit thicker wrapping paper, let it dry and then cut them out. Since my little girl is 20 months old, I didn't bother yet. It is a challenge enough for her to match all the pictures when they are the picture side up.


Your memory game is now ready. Happy playing! :)

kerli,
sincerely

Thursday, 3 December 2009

Tutorial: how to make paper snowflakes!

Hello again and sorry I haven't posted for such a long time. I am sure you have all missed me immensely. :D


I entertained the thought of selling these snowflakes, but somehow I have ended up in the tangled web of computer games and abandoned my shop a little. But since it is December, finally, and Christmassy things are justified, I am going to show you how to make them. It's the way I was taught from pvery early age and I have used snowflakes as Christmas decorations ever since, one way or the other.

You will need:
Scissors - best are the longer and sharper kind, and remember to be very careful, and not to use the tips. If you have your kids making snowflakes, choose ones that are medium sized with round tips that open and close easily. It will make a difference. There won't be as many snowflakes cut in half. :D I use big Fiskars ones.
Paper - Now here's the good time to go through your paper recycling bag and find the white printer paper that is only a bit used, like printer calibrations etc. I have used old bank statements, junk mail that has printing only on one side, receipts from internet shops. (Also, I used blue tones from regular magazines etc to make Xmas cards last year.) The best kind of paper is still white printer paper, it is stiff and hard enough and relatively cheap.

The size you need your paper to be is quarter of A4. It will leave your snowflakes about 10cm in diameter. If your snowflake makers are kids, especially not very experienced ones, I would use half an A4 for practice. These bigger snowflakes can go on windows later and they will look very nice. :)

Now to make the template (and be prepared to make about hundred of them for yourself and your children, because the folding can be tricky for little hands, but cutting is sooo much fun! I used to pester my mother to fold more and more and more snowflake bases for me). :)

Take your pre-cut paper and lay it on the table. (I usually do everything up in the air, but table may be easier to start with).


Fold it in half (shorter sides together) and turn 180 degrees so that open ends are at the bottom.


Fold the left top corner over to the right corner and press down make a little fold for the middle. NB! Do not fold the entire length.


Now for the tricky bit: Judging by eye, fold the right corner down by a third. It helps a bit if you place your left thumb on the little fold you just made. (In your mind, note down a point about 5mm to the right of the bottom left corner and line the top right corner up with that point, it should be about accurate.) Don't worry if you don't get it immediately. Practice makes perfect! :) Turn over.


Now fold down the other corner (right one again), lining the corner up with the fold you just made.


Fold the whole thing in half and turn 180 degrees. That is what your snowflake template should look like. Can you see the the lines in the middle? This is where you have to cut off the top, and your snowflake template is ready!


Your snowflake should look like this. Discard the top and you are ready for the fun bit!

You can cut any design you like into your snowflake, but over the years I have found that triangles work the best - they are easy to cut, just straight lines crossing, and the result looks realistic. Edit: I also don't draw anything onto my snowflakes, I just "go with the flow", but you might want to try and draw something on for guidelines: see the photo with all my designs this year below.


I normally start with the top to give my snowflake nice pointy ends. Of course, you can cut just little lines to give it a fringe-y edge or not cut the edge at all.
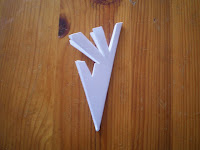

The very clever bit which results sometimes in spectacular snowflakes is here: after you have cut out a triange, you can cut another triangle into the side of the one you just made!


You can also cut off the bottom tip, to make a cute little star in the middle of your snowflake.


Another double triangle...


And if we open it up... it will look like this. Maybe not the best I have made, but definitely allright.


If you wish, you can use these designs. They will end up looking like this:


Though they aren't in the right order or anything. The best bit of making a snowflake is the opening up bit! You'll never know what they're going to be like, and sometimes relatively simple-looking design can make a surprising result! :)

Happy snowfall!

Kerli,
sincerely

P.S. I tie some thread onto my snowflakes and stick them in the ceiling with some masking tape. ;) Looks great!

Monday, 12 October 2009

Destash and upcycled supplies - is it worth it?

I've been thinking to list some of my supplies... To destash. I have some yarns (little leftover balls as well), some plarn (yes, it is a word :) - plastic yarn), some old christmas cards, and I also have entertained the thought to sell snowflake kits - 20-30 snowflakes cut out from upcycled paper - like sheets that have had printing only on one side, plus a nice sturdy printed sheet with clear instructions how to make your own. All of these things would be somewhere around £2.50 max, with postage.

And I still have my calendar and a few card kits to finish! Waah! I need more hours in a day.

Anyone?

kerli,
sincerely

P.S. I have made some little socks, for size 4-41/2. (1-2 year old) They are made of Sirdar Fair Isle, and the colours are a bit like the sea -light blue, turquoise and mint and little black specks. Socks have always been a traditional Christmas gift in our family. But I didn't know how to knit them! Heels don't like me. So this pair is only my fourth I have ever knit. I have a feeling I want to do too much, but would it be worth it at all to list them? *is curious*

Monday, 17 August 2009

Upcycle Tutorial: How to make little envelopes from used envelopes

So I finally figured out what to do with my envelopes. I made little envelopes! I wish I'd figure out what to make of plastic bags. But until then I'll help you to make your own dinky envelopes! :)

1. Start with collecting and preparing old/used/unused envelopes: rip carefully off any windows and cut open all sides. You can tear off the glued sides - it will be easier to draw the envelopes later, but don't rip the top flap off (if it was glued on). I used envelopes that had had bills, junk mail envelopes and the ones they provide with addresses on and everything, only we rarely use them, do we? So give them a new life!

2. Carefully take a small envelope apart and copy its outline onto a stronger paper - old magazine cover works a treat. Or - just download this file: envelope It's a pdf file, so you'll need Acrobat reader.


3. Sort out your envelopes. You'll need A5 sized envelopes with windows or thin envelopes without windows for the template to fit. Naturally, if you have big envelopes without windows, use them, they are the best! :D


4. Lay out your envelope, preferably on some paper, not just on hard table, white side up. Place the template on it, so that the line between top and everything else is lined up with the fold on the envelope. (Sorry for the blurry photo, but I hope you see what I mean.)


5. Draw carefully around the template. Now you should have nice envelope outlines on the paper. Repeat with all your envelopes. Cut them out. You can now recycle the leftover bits, or keep them for other projects - I used some for making tags.


6. Now, the easiest way to fold your dinky envelopes nicely and neatly is to use a ruler. Take the envelope template and place a little thin ruler on one side, edges exactly lined up with the corners. Using your preferred index finger, fold the flap down and slide up and down the ruler. That should leave you with a nice straight fold. Repeat on all sides.


7. Now you'll have something like this:


But these are just guideline folds and you'll have to reinforce them. Preferably on hard surface, fold all the flaps down one by one and slide your finger on the fold. I'm sure you'll know how to do that! :) You'll envelope will look like this:


8. Put some glue on the edges of the bottom flap, about 2/3 of the way. Stick it on top of the side flaps.


9. And there you are - your own little envelope! And since you only glued 2/3 of the sides, you can slide the tip of the top flap under the edge of the bottom flap.


Thanks for looking! If you find any mistakes or a way to make explanations easier, please tell me!

Kerli,
sincerely

P.S. You can buy a pack of 10 of these dinky envelopes in my shop.