Showing posts with label tutorials. Show all posts

Monday, 8 March 2010

Tutorial: How to make play rice


I happened to read someone's blog a few days ago, I got there through Totally Tutorials, and this lady had made little felt fish to "catch" for her 2 & 1/2 year old son. They were really cute. I read a few more of her posts and I found out that she was using Montessori method (I think she was also training to become a Montessori teacher) for all kinds of activities. It struck me how interesting and nice it was - even for myself, especially all the sensory games, so I will find out more about it and try it out.

I have started with something already, something I thought would be simple, yet interesting to my little daughter: play rice.

You will need:
* Some rice. I had open pack with about 150g of rice in it, which is absolutely enough to make a complete mess of the floor, if you let them! :D
* 4 cups (I used little glasses, but if your child is old enough, he or she might want to help with the mixing)
* Food colouring (Mine came from Tesco, as usual, cost about 80p a bottle, and it does last quite a long time. And you only need three colours: red, yellow and blue.)

* Some containers to play with - like plastic bowls, ice cream boxes, a funnel, a little beaker, empty yoghurt pots (in West Country we have Yeo Valley Organic yoghurt, which has cardboard sleeve around transparent plastic pot, you can take the sleeve off easily and have a see-through pot to play with)
* A wooden spoon (And a metal or plastic one for yourself to pick everything up :)

* Playmat or blanket (optional, but I found it easier to slide the spoon around the mat, collecting all the dropped pieces of rice)

How to:
* Divide your rice into 4 roughtly the same sized amounts into the cups
* Add a drop or two from each bottle to the first three cups - yellow, red and blue. Mix. Add a drop of yellow and tiny drop of blue into the fourth. Mix. Now you have all 4 primary colours. Alternatively, you could make 2 more colours, 6 altogether, if you wish, to maybe teach your kids how complementary colours can be made - orange from yellow and red and purple from red and blue.
* Let the rice dry for about 10-15 minutes, then stir with your finger to see whether it has dried completely.
* Pour the different colours into different plastic pots (mixing them up is added fun!), add 1-2 empty bowls and a wooden spoon.
* Give to your child and enjoy!


Emily was occupied for ages. 40 minutes from when I checked the time, and I am pretty sure we had been playing for at least 15 minutes already. She was pouring the rice from one youghurt pot to the other and to the bowl and spooning it into different pots. And she kept saying "mix mix!", laughing and stirring it in the red bowl. She was so busy that I couldn't even put her tights on and fasten her dungarees properly after changing the nappy! My job, of course, was to "drive" the spoon around the mat and collect all the pieces that had fallen out, and there were LOADS of them. It was kind of fun, but my lazy innter voice kept moaning "Why oh why oh why couldn't you be a bit more careful?!" She did say "Oh dear" in her little voice every time she dropped some, though. :O She should enjoy being messy! :D

We have played with it several times now and she is still really interested. I think she has started being deliberately messy and pouring the rice on the floor now. :P

Other ideas for the same type of play:
*Buttons
*Pebbles
*Pasta shapes (they dye quite well, too, only it makes a bit fiddlier mixing)

Have fun!

kerli,
sincerely

Thursday, 25 February 2010

Kissell! Tutorial: How to make compote

I love compote (kissell in estonian), it's quite a common dessert back there. Trouble is, it costs an arm and a leg to buy some here, so I make my own. It's not very hard anyway. (By the way, the word compote is a bit confusing to me, since "kompott" means kind of preservative, whole berries or fruit or slices of fruit preserved in their own juice/syrup, as opposed to jam, where all is mushed up.)

But back to our task: how to make some.

What you will need:
* A medium-sized saucepan or pot (Mine holds about 2+ litres)
* 2 glasses (about 500ml) of transparent not very overpowering juice, like apple or cranberry as opposed to for example orange
* Fresh fruit and/or berries and/or
* Dried fruit and/or berries and/or
* Tinned fruit and/or berries
* Some water
* Some sugar, app 2 tbsp (one tablespoon - tbsp = app 3 teaspoons -tsp)
* Spices, if you wish: 2 tsp of cinnamon and 1/2 tsp of ground cloves
* 2-3 tbsp of thickening agent, like cornflour, starch or ground arrowroot
* Some milk, whipped cream, toast, biscuits or creamy roly-poly for serving

How to make it:
* Add your juice to the pan


* Add chopped up fresh fruit (cut apples or pears in quarters, remove core, don't bother with the peeling, then cut in quarters again - to get about bite size pieces), berries, washed dried fruit/berries - about half a handful each. No need to soak. Don't forget raisins or sultanas, they're essential! :) I also love tinned plums in my compote, but I couldn't find any this week. In one sentence, add whatever you like and whatever you have. :) I had apples, dried apricots and prunes and some raisins. So, in they all went.


*Also, add your spices and sugar. Top up with water until it's 3-5 cm from the edge.


* Bring to boil (on the scale of 6 points like my hob has, I use 4) then simmer gently (on 1,5-2) under the lid until all the ingredients are soft and plump. That should take about an hour.
* Put 2-3 tbsp of corn flour/starch/ground arrowroot into a cup, add a bit cold water and mix until everything is dissolved, keep adding water until your mix looks like milk.


* Pour your mix into the pot while stirring, so that it blends well, then keep stirring slowly until you notice your compote thickening. It doesn't take long, just a few minutes.


* Take your pan off the hotplate, stir some more and let it cool down.
* Serve cold with milk, whipped cream, pieces of toast, plain soft vanilla biscuits or creamy roly-poly. Whatever you fancy, really!


Serves about 4

When I think about variations, I guess more spices would be nice around Christmas. Orange zest maybe? And eat it with gingerbread? I've never made compote with orange juice, but maybe it will be allright. Any brave experimenters? :)

kerli,
sincerely

Friday, 15 January 2010

Tutorial: Make an upcycled memory game

Have you ever thought what to do woth used wrapping paper? I feel terribly guilty when I throw them away, especially when some of them have great pictures on and sometimes the paper is thick and of good quality. Now I have found one use for them: Make a memory game for your kids. If they are babies, then this is a great way of teaching them some words, and they can help, if they are old enough (at least 4, I would think), and get more fun out of it! :)

You will need:
*Used piece of wrapping paper that has pattern with little recurring motives on it. It can be christmas one, or birthday one. You can even use several different ones to get more pairs. Try to choose bits that doesn't have many creases on them, but I don't think most kids care. (If you are planning covering the back as well, get another - different - wrapping paper)
*Scissors
*Some glue, PVA is the best, but some glue sticks work quite well too.
* Bits of light cardboard. I usually keep some empty cereal boxes etc in my kitchen in case I need some.

Let's make it!
*Cut out your motives. You can make as many pairs as you like (or as you can). I made 8 pairs - 16 pieces.


*Take your cardboard and put one of your motives on it, if the motives are of different sizes, then the biggest one. Draw a square round it, cut it out and use it as a template for other ones. My squares came from lasagne pasta and fish cake box.


* Glue your motives on your squares and let them dry. If you want to cover the backs to make a "proper" memory game, then this is the time to do it. Glue your squares loosely on a bit thicker wrapping paper, let it dry and then cut them out. Since my little girl is 20 months old, I didn't bother yet. It is a challenge enough for her to match all the pictures when they are the picture side up.


Your memory game is now ready. Happy playing! :)

kerli,
sincerely

Thursday, 3 December 2009

Tutorial: how to make paper snowflakes!

Hello again and sorry I haven't posted for such a long time. I am sure you have all missed me immensely. :D


I entertained the thought of selling these snowflakes, but somehow I have ended up in the tangled web of computer games and abandoned my shop a little. But since it is December, finally, and Christmassy things are justified, I am going to show you how to make them. It's the way I was taught from pvery early age and I have used snowflakes as Christmas decorations ever since, one way or the other.

You will need:
Scissors - best are the longer and sharper kind, and remember to be very careful, and not to use the tips. If you have your kids making snowflakes, choose ones that are medium sized with round tips that open and close easily. It will make a difference. There won't be as many snowflakes cut in half. :D I use big Fiskars ones.
Paper - Now here's the good time to go through your paper recycling bag and find the white printer paper that is only a bit used, like printer calibrations etc. I have used old bank statements, junk mail that has printing only on one side, receipts from internet shops. (Also, I used blue tones from regular magazines etc to make Xmas cards last year.) The best kind of paper is still white printer paper, it is stiff and hard enough and relatively cheap.

The size you need your paper to be is quarter of A4. It will leave your snowflakes about 10cm in diameter. If your snowflake makers are kids, especially not very experienced ones, I would use half an A4 for practice. These bigger snowflakes can go on windows later and they will look very nice. :)

Now to make the template (and be prepared to make about hundred of them for yourself and your children, because the folding can be tricky for little hands, but cutting is sooo much fun! I used to pester my mother to fold more and more and more snowflake bases for me). :)

Take your pre-cut paper and lay it on the table. (I usually do everything up in the air, but table may be easier to start with).


Fold it in half (shorter sides together) and turn 180 degrees so that open ends are at the bottom.


Fold the left top corner over to the right corner and press down make a little fold for the middle. NB! Do not fold the entire length.


Now for the tricky bit: Judging by eye, fold the right corner down by a third. It helps a bit if you place your left thumb on the little fold you just made. (In your mind, note down a point about 5mm to the right of the bottom left corner and line the top right corner up with that point, it should be about accurate.) Don't worry if you don't get it immediately. Practice makes perfect! :) Turn over.


Now fold down the other corner (right one again), lining the corner up with the fold you just made.


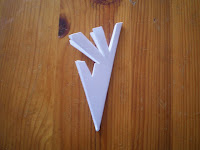
Fold the whole thing in half and turn 180 degrees. That is what your snowflake template should look like. Can you see the the lines in the middle? This is where you have to cut off the top, and your snowflake template is ready!


Your snowflake should look like this. Discard the top and you are ready for the fun bit!

You can cut any design you like into your snowflake, but over the years I have found that triangles work the best - they are easy to cut, just straight lines crossing, and the result looks realistic. Edit: I also don't draw anything onto my snowflakes, I just "go with the flow", but you might want to try and draw something on for guidelines: see the photo with all my designs this year below.


I normally start with the top to give my snowflake nice pointy ends. Of course, you can cut just little lines to give it a fringe-y edge or not cut the edge at all.


The very clever bit which results sometimes in spectacular snowflakes is here: after you have cut out a triange, you can cut another triangle into the side of the one you just made!


You can also cut off the bottom tip, to make a cute little star in the middle of your snowflake.


Another double triangle...


And if we open it up... it will look like this. Maybe not the best I have made, but definitely allright.


If you wish, you can use these designs. They will end up looking like this:


Though they aren't in the right order or anything. The best bit of making a snowflake is the opening up bit! You'll never know what they're going to be like, and sometimes relatively simple-looking design can make a surprising result! :)

Happy snowfall!

Kerli,
sincerely

P.S. I tie some thread onto my snowflakes and stick them in the ceiling with some masking tape. ;) Looks great!

Friday, 25 September 2009

Kittie Hat!


Yes, I have finally added the pattern. :) (The explanation is probably for idiots. :D If you can come up with something better and easier, be my guest. :)

NB. There aren't actual numbers for stitches, you will have to calculate things to match the person you are knitting to.


What you will need:
*6-7 mm needles, either circular or dpn
*Some Wendy Fusion or similar yarn (I used 156 White Pepper and a bit of 155 Cajun)
*Tapestry needle

1. Measure the head of the person the hat is for. My little girl measured 51 cm.

2. Knit a little patch with your yarn and needles, 20 st and 10 rows. Measure, how many stitches you have on 10 cm (4 in). I had 11, so that's a bit more than 1 stitch per cm (or 2,6 st per in)

3. Cast on the number of st you need - multiply the number of stitches per cm (in) with the measurements of head: 51 x 1,1 = 56,1. You can add one stitch, just for good measure. :)

4. Divide onto 4 needles (if you use dpn). Join the ends - pull the bit of yarn that hangs off from the last stitch through the first one and tie the ends together - be careful not to twist.

5. Now all you have to do is knit in the round. You don't have to mark the beginning - there should be a bit of yarn hanging off from the join. :)

6. You can try it on after about 15-20 cm, there's no need to do it before. Knit until the two opposite sides of your knitting touch each other on the top of your (or your baby's etc.) head when you try it on and the bottom edge of your hat is a)in the middle of your forehead and b)covering your skull and touching the back of your neck. The knitting should feel nice and loose around the head.

7. Fold your knitting in half, leaving the beginning on one side. Cut the yarn, about twice the length of the top end of your knitting. Now you'll need your needle. Thread it (yarn it :) and start pulling the yarn through the stitches, taking them alternately from both front and back needles. You don't have to sew, just thread through the stitches as if you would be putting beads on it.

8. When you get to the end, make a tiny little knot. Don't cut the yarn. Insert the needle back into your knitting right next to the knot and draw it out about quarter of the way back on the top. Sew an "ear" onto your hat. Make the "side" side of the ear a bit shorter than the "top" side. (See photo) Cut the yarn. Sew an ear onto the other side as well.


9. Now, if you wish, you can add a bit of pink embroidery onto the ears. Stitch is entirely your choice. I tried to imitate a knit stitch, the little "v". You also may or may not add a bit of twisted cord. If you make twisted cord, I recommend you attach it to the hat with cow hitch knot. Just don't tie a knot into and cut off the closed loopy end.

Good luck! :)

kerli,
sincerely

Tuesday, 8 September 2009

Tutorials: Recipe of Beetroot Soup (Borsch)

250 g minced meat - beef or pork. You can use just chopped meat as well, I am sure
1 stock cube of your choice
1,5 l of water
1 biggish carrot
1 onion
2-3 potatoes
200 g beetroot
150 g cabbage
2 tbsp tomato puree
1 tbsp vinegar
a bit of oil
1 teasp of salt
1 tbsp of sugar
herbs and spices of your choice, definitely add pepper or paprika - something strong. dill and garlic won't hurt either. :)

A good dollop of soured cream/creme fraiche/greek style natural yoghurt

*Heat the oil in the bottom of a saucepan or pot big enough to fit all the soup in. Brown the meat until juices run clean, and if you like well done meat, even more, until it starts slightly burn and goes dark brown on one side.
*While the meat is cooking, cut the carrot into thin slices or small cubes. It's because carrots and swedes take muck longer to cook than potatoes and cabbage. When the meat is cooked to your liking, add the carrot and also chop or cut onion to add in. (I usually just kind of half-slice the onion in my hand above the pot. It's quick. :) Cover with lid and cook until onions are slightly transparent.
*While that is happening, peel and chop your potatoes and slice cabbage. also, you could start chopping your beetroots into smallish cubes. Add water, potatoes, cabbage and stock cube to your pot and steam the beetroot on a different pan (preferably on a wide frying pan, yes) with tomato puree and vinegar. Add few scoopfuls of soup from your pot.
*When everything is nice and done, add the beetroot to your soup. Cook for another 5-10 minutes, adding salt, sugar and all your herbs and spices.

Let it stand as long as you can. Serve with soured cream/creme fraiche/greek style natural yoghurt. Believe me, it makes all the difference.


So there you are. Quite a bit of chopping, but it's nice in the end, really. :) If you live somewhere where there is russian/polish shop, then you can go and look for some real borsch as well. It's usually in 1l glass jar, you have to add water yourself, and it looks and reads kind of like this:

Look for the text. It is pronounced BOR (then the fourth symbol reads) CHTCH (though you don't really say it like this, it's just a quicker "sssh" sound; and fifth is just making it sound more palatalized http://en.wikipedia.org/wiki/Palatalization, so we add J)
BORCHTCHJ
:D

P.S. You can make it completely without meat, it still tastes nice. ;)

Kerli,
sincerely

Monday, 17 August 2009

Upcycle Tutorial: How to make little envelopes from used envelopes

So I finally figured out what to do with my envelopes. I made little envelopes! I wish I'd figure out what to make of plastic bags. But until then I'll help you to make your own dinky envelopes! :)

1. Start with collecting and preparing old/used/unused envelopes: rip carefully off any windows and cut open all sides. You can tear off the glued sides - it will be easier to draw the envelopes later, but don't rip the top flap off (if it was glued on). I used envelopes that had had bills, junk mail envelopes and the ones they provide with addresses on and everything, only we rarely use them, do we? So give them a new life!

2. Carefully take a small envelope apart and copy its outline onto a stronger paper - old magazine cover works a treat. Or - just download this file: envelope It's a pdf file, so you'll need Acrobat reader.


3. Sort out your envelopes. You'll need A5 sized envelopes with windows or thin envelopes without windows for the template to fit. Naturally, if you have big envelopes without windows, use them, they are the best! :D


4. Lay out your envelope, preferably on some paper, not just on hard table, white side up. Place the template on it, so that the line between top and everything else is lined up with the fold on the envelope. (Sorry for the blurry photo, but I hope you see what I mean.)


5. Draw carefully around the template. Now you should have nice envelope outlines on the paper. Repeat with all your envelopes. Cut them out. You can now recycle the leftover bits, or keep them for other projects - I used some for making tags.


6. Now, the easiest way to fold your dinky envelopes nicely and neatly is to use a ruler. Take the envelope template and place a little thin ruler on one side, edges exactly lined up with the corners. Using your preferred index finger, fold the flap down and slide up and down the ruler. That should leave you with a nice straight fold. Repeat on all sides.


7. Now you'll have something like this:


But these are just guideline folds and you'll have to reinforce them. Preferably on hard surface, fold all the flaps down one by one and slide your finger on the fold. I'm sure you'll know how to do that! :) You'll envelope will look like this:


8. Put some glue on the edges of the bottom flap, about 2/3 of the way. Stick it on top of the side flaps.


9. And there you are - your own little envelope! And since you only glued 2/3 of the sides, you can slide the tip of the top flap under the edge of the bottom flap.


Thanks for looking! If you find any mistakes or a way to make explanations easier, please tell me!

Kerli,
sincerely

P.S. You can buy a pack of 10 of these dinky envelopes in my shop.